Strangely all my articles to date have been Sismo-related. I think it’s because it has been the biggest challenge thus far to get working. Very frustrating at first but the more I come to understand how their products work, the easier it gets, just like most things.
Since the release of Prosim v2.0 the Sismo drivers have been incorporated into Prosim itself, meaning no more confusing SC-Pascal scripts, no more IOCP needed, and really far fewer headaches in my humble opinion.
The Setup
To show how to get this all working I’ll use my scenario, which is that I am building an AFT Overhead consisting of the following pieces:
- Prosim v2.x running on my P3D v4 computer
- Sismo SC MB Ethernet card configured as an AFT Overhead
- Daughter Card v4
- Sismo IRS Panel
- Sismo LE Devices Panel
- FDS SYSX 1 (to connect the remaining LEDs and Switches)
Figure 1-1 shows the various Sismo connections and the devices I’m using (circled in red).

Configuring the SC MB Ethernet
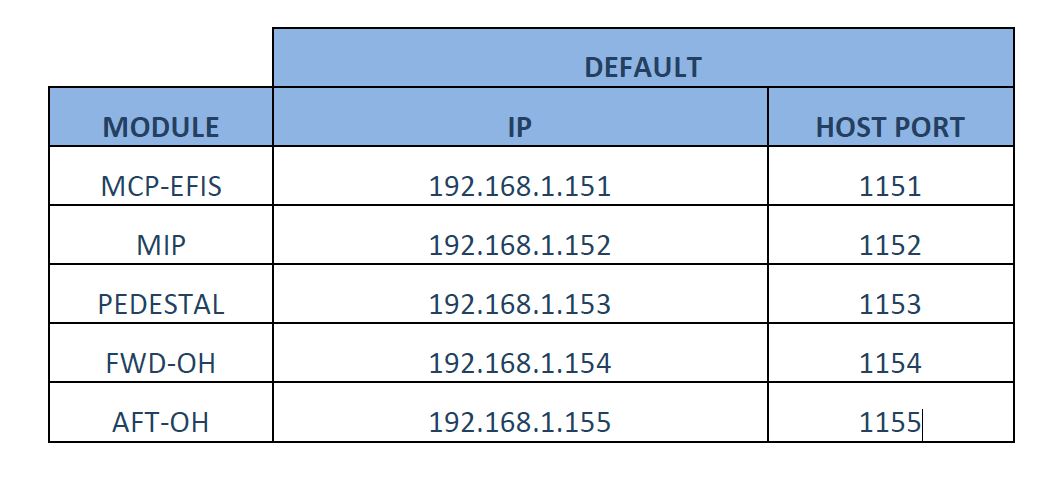
First step will be to configure the Sismo SC MB Ethernet card. From the factory the card is configured with default IP address of 192.168.1.150. This is per page 27 of the Sismo SimCard SC-MB Ethernet Ed4 user manual linked below.
To connect to that IP, you must first make sure the computer you are connecting from is on the same network as the card. So, in my case I have a laptop. Here are the steps I followed:
- Connected my laptop using an Ethernet cable to the same physical network switch as the SC-MB Ethernet card is connected to.
- Change the IP on my laptop to be 192.168.1.x (you can make x whatever you want so long as it’s not 150). Subnet should be 255.255.255.0. No gateway is needed.
- Open a browser window on the laptop and browse to http://192.168.1.150. You should immediately see the SC-MB web-based interface which will look something like Figure 1-2 below:

- Under NETWORK CONFIG, change the IP address/mask/default gateway to a unique IP address on the same network as the Prosim Server. Make sure the Mask and Gateway are the same as your Prosim Server’s settings.
- Under UDP CONFIG change the Host IP to the IP address of the Prosim Server, leave the Local Port as the default 1024, and change the Host Port to the port for the type of card this will be acting as, per the table in Figure 1-3 below:

In my case, I am setting up an AFT Overhead, so I will set the Host Port to 1155 per the table in Figure 1-3 above.
NOTE: Disregard the IP’s listed in the table as they don’t apply if you are using an SC-MB card. You’d only use those IP’s to browse to the web configuration page if you were using the listed module (i.e. if you bought a MIP board, then you’d browse to 192.168.1.152 instead of .150 to get to the web config page). Since we’re using a generic SC-MB Ethernet, it always has a default .1.150 IP.
- Under DAUGHTER BOARDS CONFIG select if you have any daughter boards attached to the SC-MB card. I have one GIC v4 Daughter Card acting as an input board per Diagram 1-1 above so I selected SC-MDIDB INPUTS 1 to ON.
- Save the settings by clicking Save Board Config. The board will reboot and when it comes up it will now be using the new IP address you configured for it, which should be the same network Prosim Server is on and therefore ProSim can now talk to the card.To confirm this, on your Prosim server computer try browsing to the new IP you configured for the SC-MB card. You should be able to pull up the web-based interface. If you can’t then you may have to reset the card to the defaults and try again (there is a Reset switch on the SC-MB card that forces the card back to default settings).

Configuring Prosim v2.0 to talk to Sismo Cards
With version 2.0 of Prosim, it has become much easier to connect to your Sismo card using their inbuilt drivers. Everything should be programmed for you so no need to figure out SC-Pascal programming.
Start by opening up Prosim Server. If the SC-MB card is configured correctly, you should see it appear under the IO Modules of Prosim as in Figure 1-5 below. In this case, the SC-MB is being correctly identified as the AFT Overhead module, which is based on the AFT Overhead port I had configured in the SC-MB web config from the table in Figure 1-3 above.
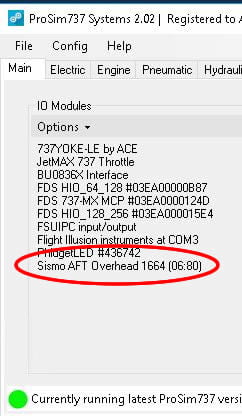
NOTE: If you’re not seeing the card appearing here, there is a communication/configuration issue somewhere and you should go back and verify everything is correct from the previous steps.
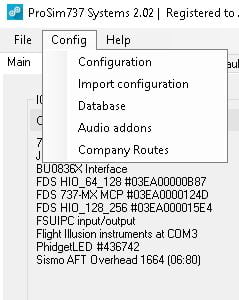
Now click the Prosim Config dropdown menu and select Configuration as in Figure 1-4 below.
On the configuration window, select the Drivers tab. Scroll down to “Sismo ethernet boards support” and check the Enabled check box as in Figure 1-5 below.
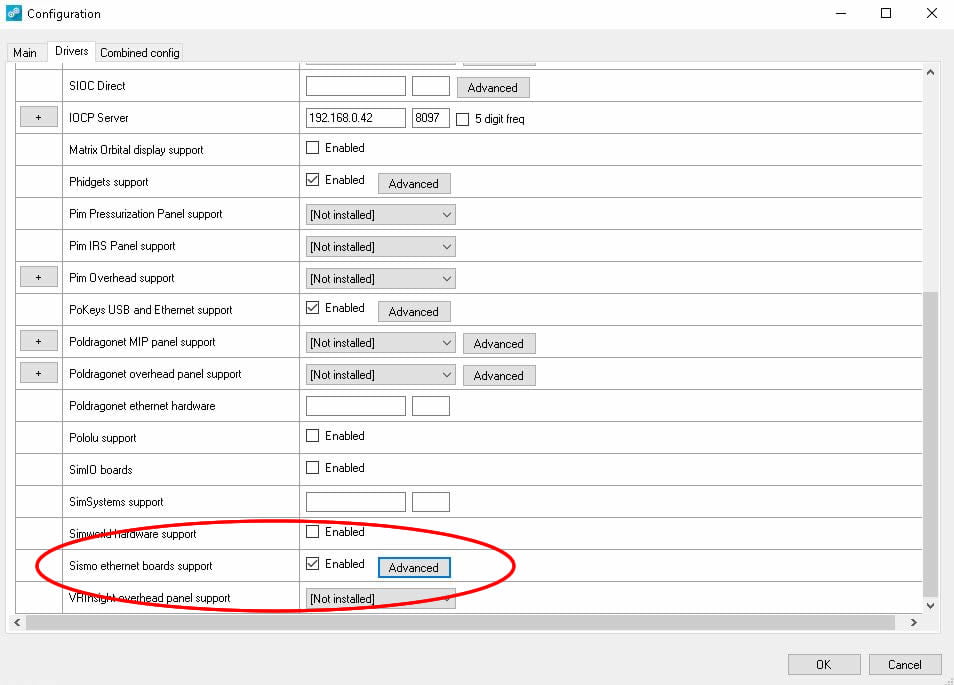
Then click the Advanced button next to it. You’ll now have a window with tabs for each of the major Sismo modules as in Figure 1-6 below.
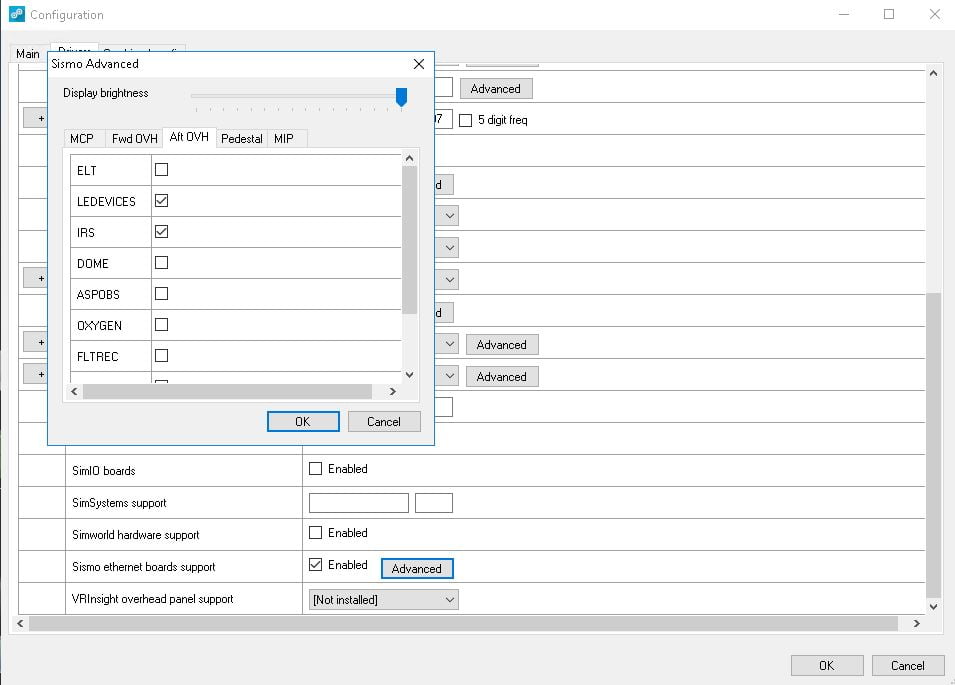
In this case the modules on all tabs will be grayed out except for the Aft OVH tab since I set up the SC-MB card to talk to Prosim and Prosim is seeing it. If I click that tab I will now have access to select which AFT OVHD Sismo modules I have installed. In my case, I am using the IRS and LEDEVICES hardware modules so I select those and click OK. At this point those modules should come alive.
Conclusion
I hope this has helped you get your Sismo SC-MB card up and running. The process is WAY simpler in Prosim 2.x than it was with Prosim v1.x where you had to do a bit more configuration with SC-Pascal running, importing Pascal scripts, potentially needing to deal with IOCP offsets, etc.
Feel free to contact me or comment if you have any questions. If I can help I will try.